Windowsのマウス操作向け設定 (Point-N-Click)
投稿者:マーチン 2019年11月10日
カテゴリ:上肢障碍者向け
カテゴリ:上肢障碍者向け
「Point-N-Click」という、マウスの移動だけで、ダブルクリックやドラッグや右クリックができる海外製の無料のソフトを紹介します。有料のソフトなら他にもありますが、無料で高機能で自由にカスタマイズできる(その代わり設定は難解)ソフトです。ソフトの一部の機能しか使っていませんが、マウスポインターを動かすことさえできれば、左クリック、右クリック、左ドラッグ、左ダブルクリックを実行できます。
●動画
◆シングルクリックとPoint-N-Click でマウス操作をする
◆Point-N-Click だけで、クリックせずにマウス操作をする
●概要

Point-N-Click is a FREE stand-alone on-screen virtual mouse designed for anyone with a disability that makes it difficult or impossible to click a physical computer mouse.
Point-N-Clickは、物理的なコンピューターのマウスをクリックすることが困難または不可能な障害を持つ人向けに設計された無料のスタンドアロンのオンスクリーン仮想マウスです。
As long as they can move a mouse, trackball or other pointing device, they can send mouse clicks to virtually any Windows application or DOS application that can run within a window and even many that are full screen.
マウス、トラックボール、またはその他のポインティングデバイスを移動できる限り、ウィンドウ内およびフルスクリーンの多くで実行可能なWindowsアプリケーションまたはDOSアプリケーションのほとんどにマウスクリックを送信できます。
Point-N-Click is a 32 bit Windows® application and runs on the following operating systems: Windows® 95/98/NT4.x/Me/2000/XP/Vista/Windows 7/WIndows 8/Windows 10.
Point-N-Clickは32ビットWindows®アプリケーションであり、次のオペレーティングシステムで実行されます。Windows®95/98 / NT4.x / Me / 2000 / XP / Vista / Windows 7 / WIndows 8 / Windows 10。
Notice, the buttons are big so you can hit them. Of course, when not in use Point-N-Click can be hidden so it's out of your way but ready to pop up with the sweep of the mouse pointer.
ボタンが大きいため、ボタンを押すことができます。 もちろん、使用していないときは、邪魔にならないようにPoint-N-Clickを非表示にして、マウスポインターのスイープでポップアップできます。
The form is user configurable so that if you don't need a function you don't have to see the button. Don't like the size? Just resize it to what YOU need.
このフォームはユーザーが設定できるため、機能が必要ない場合はボタンを表示する必要はありません。サイズが気に入らない? 必要なサイズに変更してください。
●インストール
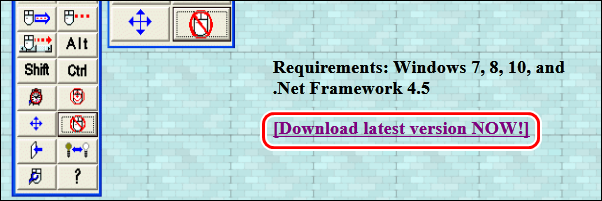
(1)https://www.polital.com/pnc/ を開いて、[Download lastest version NOW!] をクリックして、ファイルを保存する。
(2)ダウンロードしたファイル(PNCNETsetup.msi) を実行する。
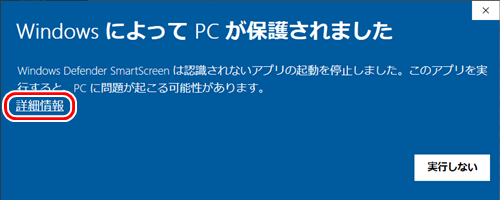
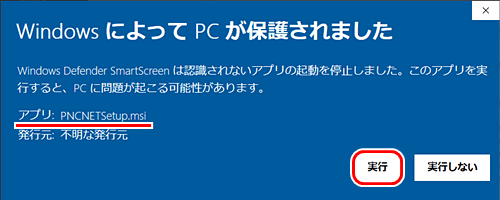
(3)安全なアプリでも、発行元が不明な場合や、ダウンロードされた実績が少ない場合に、「WindowsによってPCが保護されました」と表示されることがあります。[詳細情報] をクリックする。
[実行] をクリックする。
(4)"Welcome to the Point-N-Click Setup Wizard" ⇒ [Next]
"Choose Destination Location" ⇒ [Next]
"Completing the Point-N-Click Setup Wizard" ⇒ [Finish]
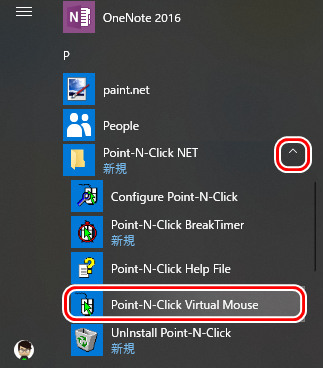
(5)田[スタート]、[Point-N-Click NET]、[Point-N-Click Virtual Mouse] をクリックする。
(6)初めて起動したときには、パラメータ設定のダイアログが表示されるが、後で設定するので[Cancel] をクリックする。
(7)後で設定するので[Cancel] をクリックする。
(2)ダウンロードしたファイル(PNCNETsetup.msi) を実行する。
(3)安全なアプリでも、発行元が不明な場合や、ダウンロードされた実績が少ない場合に、「WindowsによってPCが保護されました」と表示されることがあります。[詳細情報] をクリックする。
[実行] をクリックする。
(4)"Welcome to the Point-N-Click Setup Wizard" ⇒ [Next]
"Choose Destination Location" ⇒ [Next]
"Completing the Point-N-Click Setup Wizard" ⇒ [Finish]
(5)田[スタート]、[Point-N-Click NET]、[Point-N-Click Virtual Mouse] をクリックする。
(6)初めて起動したときには、パラメータ設定のダイアログが表示されるが、後で設定するので[Cancel] をクリックする。
(7)後で設定するので[Cancel] をクリックする。
●設定例
◆マウスのシングルクリックができる人用設定
マウスのシングルクリックができる、初心者向けの設定を紹介します。シングルクリックはマウス左ボタンを使い、その他のクリックはPoint-N-Click の滞留時間による自動クリックを使います。
(1)田[スタート]、[Ponit-N-Click NET]、[Configure Ponit-N-Click] をクリックする。
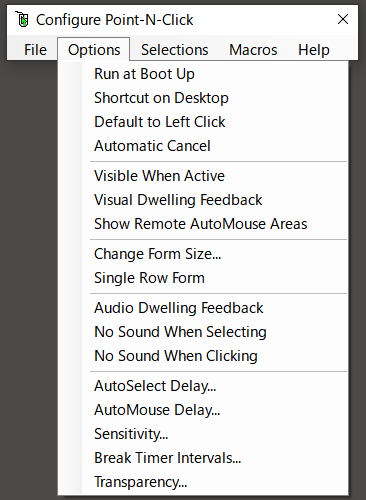
(2)[Options] タブで、以下の項目にチェックを入れる。

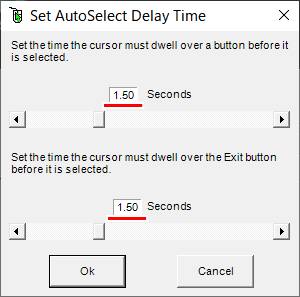
(3)[Options] [AutoSelect Delay...] で、1.5秒、1,5秒
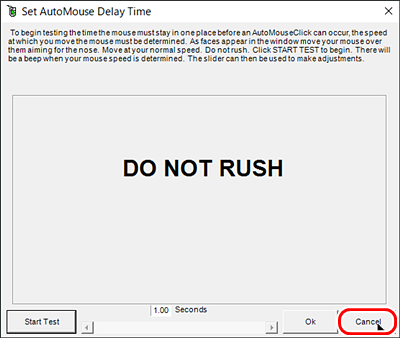
(4)[Options] [AutoMouse Delay...] で、3秒
ポインタを速く動かせない時は大きく、慣れてきて速い操作ができるようになったら小さくする。

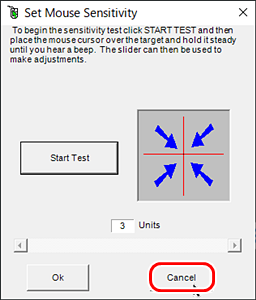
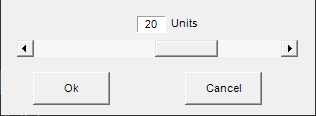
(5)[Options] [Sensivility...] で、20 Units
ポインタを一か所に留められない時は大きく、細かいものをクリックする時は小さくする。
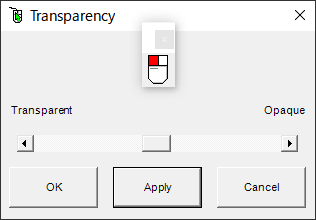
(6)[Options] [Transparency...] で、約50%
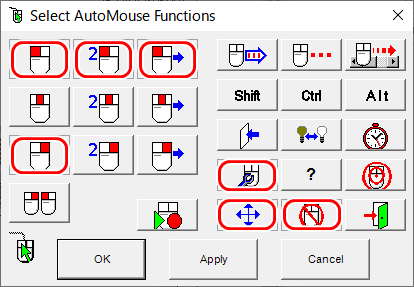
(7)[Selections] [AutoMouse Functions...] で、赤線で囲ったボタンだけ選択(押した状態)する。
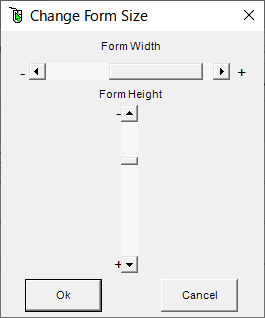
(8)[Options] [Change Form Size...] で、フォームの寸法を調整する。
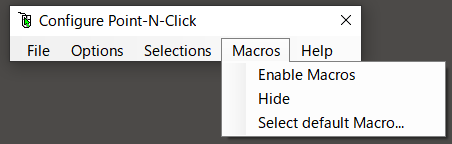
(9)[Macros] で、全てのチェックを外す。
(1)田[スタート]、[Ponit-N-Click NET]、[Configure Ponit-N-Click] をクリックする。
(2)[Options] タブで、以下の項目にチェックを入れる。
(3)[Options] [AutoSelect Delay...] で、1.5秒、1,5秒
(4)[Options] [AutoMouse Delay...] で、3秒
ポインタを速く動かせない時は大きく、慣れてきて速い操作ができるようになったら小さくする。
(5)[Options] [Sensivility...] で、20 Units
ポインタを一か所に留められない時は大きく、細かいものをクリックする時は小さくする。
(6)[Options] [Transparency...] で、約50%
(7)[Selections] [AutoMouse Functions...] で、赤線で囲ったボタンだけ選択(押した状態)する。
(8)[Options] [Change Form Size...] で、フォームの寸法を調整する。
(9)[Macros] で、全てのチェックを外す。
◆マウスのシングルクリックができない人用設定
マウスのシングルクリックもできない場合は、左クリック、右クリック、左ドラッグに、Point-N-Click の滞留時間による自動クリックを使います。
(1)田[スタート]、[Ponit-N-Click NET]、[Configure Ponit-N-Click] をクリックする。
(2)[Options] タブで、前に示した設定に加えて、[Default to Left Click] にチェックを入れる。
ほかのクリック方法を実行した後には、左クリックアイコンが選択された状態(背景が赤)に戻ります。キャンセルアイコン(下から2番目)を実行することで、左クリックアイコンの選択を中断できます。
(1)田[スタート]、[Ponit-N-Click NET]、[Configure Ponit-N-Click] をクリックする。
(2)[Options] タブで、前に示した設定に加えて、[Default to Left Click] にチェックを入れる。
ほかのクリック方法を実行した後には、左クリックアイコンが選択された状態(背景が赤)に戻ります。キャンセルアイコン(下から2番目)を実行することで、左クリックアイコンの選択を中断できます。
======== 以下、ヘルプファイルの一部です。参考にしてください。 ========
●インストールとアンインストール
◆インストール
If you have downloaded the PNCzip.exe self extracting archive file, run it and select Unzip to extract the installation file. It will go into your temporary storage by default. If you're on Vista, you will be asked to give the UAC pemission to continue the installation. Then follow instructions.
PNCzip.exe自己解凍アーカイブファイルをダウンロードした場合は、それを実行し、Unzipを選択してインストールファイルを解凍します。 デフォルトで一時ストレージに保存されます。 Vistaを使用している場合、インストールを続行するためにUACに許可を与えるよう求められます。 その後、指示に従ってください。
After accepting the defaults, you will find Point-N-Click on your Start |All Programs menu. Proceed to the Getting Started section. Note: You no longer need PNCzip.exe. It can be deleted.
デフォルトを受け入れた後、[スタート]メニューにPoint-N-Clickが表示されます。 「はじめに」セクションに進みます。 注:PNCzip.exeは不要になりました。 削除できます。
◆アンインストール
Although you may use Window’s “Control Panel | Add|Remove Programs”, you will find it easier to smoothly remove Point-N-Click from your system by following the steps below:
Windowsの[コントロールパネル| プログラムの追加|削除]を選択すると、以下の手順を実行することにより、システムからPoint-N-Clickをスムーズに削除することが簡単になります。
Windowsの[コントロールパネル| プログラムの追加|削除]を選択すると、以下の手順を実行することにより、システムからPoint-N-Clickをスムーズに削除することが簡単になります。
●はじめに
◆はじめに
After installing Point-N-Click, you’ll be able to access it, like any other program, from your “Start | Programs | Point-N-Click | Point-N-Click” menu.
Point-N-Clickをインストールすると、他のプログラムと同様に、[スタート| Point-N-Click | Point-N-Click] メニューから起動できます。
The first time you run Point-N-Click it will bring up two forms for setting the parameters for your personal mouse handling needs. These customization forms will also come up if you run the configuration program. The configuration program can also be used to set other options.
Point-N-Clickを初めて実行すると、個人的なマウス処理のニーズに合わせてパラメーターを設定するための2つのフォームが表示されます。設定プログラムを実行しても、これらのカスタマイズフォームが表示されます。設定プログラムを使用して、他のオプションを設定することもできます。
You may want to choose “Run at Boot Up” so the next time you turn on your computer Point-N-Click will be ready and waiting for you without the need for a click.
[Run at Boot Up(起動時に実行)]を選択すると、次回コンピュータの電源を入れるときに、Point-N-Clickの準備が整い、クリックすることなく待機ができます。
If you do not need Point-N-Click always available you may wish, instead, to turn on “Shortcut on Desktop”. You’ll be able to start Point-N-Click just by double-clicking its icon on your Desktop.
Point-N-Click を常に使用する必要がない場合は、代わりに[Shortcut on Desktop]をオンにすることをお勧めします。デスクトップ上のアイコンをダブルクリックするだけで、Point-N-Clickを開始できます。
When Point-N-Click is started it will automatically select Left Click and Repeat With Movement Required. If you do not want this option it can be changed with the configuration program under “Options | Start with Repeat Left Click selected.”
Point-N-Clickが開始されると、自動的に左クリックを選択し、必要な動きで繰り返します。 このオプションが必要ない場合は、設定プログラムで[Options|Default To Left Click] のチェックを外します。
Start the configuration program either from the “Start | Programs | Point-N-Click | Configure Point-N-Click” menu or by hovering over the “Configure Options” button on the Point-N-Click form.
[スタート| Point-N-Click | Configure Point-N-Click]メニューを使用するか、Point-N-Clickフォームの[設定オプション]ボタンにカーソルを合わせます。
Select “Options|Sensitivity...”. The form displayed allows controlling how sensitive Point-N-Click is to mouse movement. It is used to measure how much ‘jiggle’ the user experiences when trying to hold the mouse in one place. Follow the directions.
[オプション|感度...]を選択します。 表示されるフォームでは、マウスの動きに対するPoint-N-Clickの感度を制御できます。 これは、マウスを1か所で保持しようとしたときにユーザーがどの程度[jiggle(揺れる)]するかを測定するために使用されます。 指示に従う。
At the end of the test the slider bar will be active to allow fine tuning the mouse sensitivity to ‘jiggle’. Manual adjustments of this value should be done with care as improper settings will make the program ineffective. The test can always be re-run to correct errors caused by manual adjustments.
テストの終了時に、スライダーバーがアクティブになり、マウスの感度を[jiggle(揺れる)]に微調整できます。 不適切な設定はプログラムを無効にするため、この値の手動調整は注意して行う必要があります。 テストはいつでも再実行して、手動調整によって生じたエラーを修正できます。
Select “Options|Auto Mouse Delay ..”. The form displayed allows controlling how long the mouse pointer has to hover over a spot before the selected mouse click event will activate. It estimates this value based on the speed and accuracy the user has moving to targets.
[Options|Auto Mouse Delay ..]を選択します。 表示されるフォームを使用すると、選択したマウスクリックイベントがアクティブになる前に、マウスポインターがスポット上をホバーする時間を制御できます。 ユーザーがターゲットに移動する速度と精度に基づいて、この値を推定します。
Follow the directions and DO NOT RUSH. It is important to determine your normal mouse movement speed. At the end of the test the slider bar will be active to allow fine tuning the Auto Mouse Delay time.
指示に従い、ラッシュしないでください。 通常のマウスの移動速度を決定することが重要です。 テストの終了時に、スライダーバーがアクティブになり、自動マウス遅延時間を微調整できます。
Manual adjustments of this value should be done with care as improper settings will make the program ineffective. The test can always be re-run to correct errors caused by manual adjustments.
不適切な設定はプログラムを無効にするため、この値の手動調整は注意して行う必要があります。 テストはいつでも再実行して、手動調整によって生じたエラーを修正できます。
To demonstrate AutoMouse clicking let’s start up your favorite Word Processor. Or if you want, just start the Notepad program. To do this we must access the system TaskBar “Start | Programs | Accessories | Notepad”.
AutoMouseのクリックを実演するために、お気に入りのワープロを起動してみましょう。 または、必要に応じて、メモ帳プログラムを起動してください。 これを行うには、システムのタスクバーにアクセスする必要があります。[ スタート| Windowsアクセサリー| メモ帳]。
Hover your mouse pointer over the Left Click button of the Point-N-Click form. It will turn yellow to indicate that you are positioned correctly. Wait until it turns red then move over to the TaskBar and hover over the Start button until you hear the click and the menu opens.
Point-N-Clickフォームの左クリックボタンにマウスポインターを合わせます。 黄色に変わり、正しく配置されたことを示します。 赤に変わるまで待ってから、タスクバーに移動し、クリック音が聞こえてメニューが開くまで[スタート]ボタンにカーソルを合わせます。
Repeat this procedure to access the Programs menu then the Accessories menu and finally Notepad. The keyboard or a virtual keyboard such as Click-N-Type can now be used to enter text. The Word Processor’s menu system can be activated in the same manner.
この手順を繰り返して、[Windows アクセサリ]メニュー、最後にメモ帳にアクセスします。 キーボードまたはClick-N-Typeなどの仮想キーボードを使用してテキストを入力できるようになりました。 ワープロのメニューシステムも同じ方法で有効にできます。
To start a program that has an icon on the Desktop, hover over the Double Click button . It will turn yellow to indicate that you are positioned correctly. Wait until it turns red and then hover over the icon on your Desktop until you hear the double click and the program starts. That’s all there is to it. You can use the computer as it was designed to be used.
デスクトップにアイコンのあるプログラムを開始するには、ダブルクリックボタンの上にカーソルを置きます。 黄色に変わり、正しく配置されたことを示します。 赤に変わるまで待ってから、デスクトップのアイコンの上にカーソルを置くと、ダブルクリックの音が聞こえてプログラムが起動します。 それだけです。 使用するように設計されたコンピューターを使用できます。
●Point-N-Clickでの作業
◆オプション設定
The Configuration program has five menu options: File, Options, Selections, Macros, and Help.
設定プログラムには、ファイル、オプション、選択、マクロ、ヘルプの5つのメニューオプションがあります。
設定プログラムには、ファイル、オプション、選択、マクロ、ヘルプの5つのメニューオプションがあります。
- [File]タブ
- [Uninstall Point-N-Click...]
Please see Uninstall in the Installing & Uninstalling section.
「インストールとアンインストール」セクションの「アンインストール」をご覧ください。
- [Exit]
Closes the Configuration program.
設定プログラムを閉じます。
- [Uninstall Point-N-Click...]
- [Options]タブ
- [Run at Boot Up]
Causes Point-N-Click to automatically start every time you start your computer. This is done by placing a Shortcut in your StartUp Program Group.
コンピュータを起動するたびに、Point-N-Clickが自動的に起動します。 これを行うには、スタートアッププログラムグループにショートカットを配置します。
- [Shortcut on Desktop]
Places a shortcut to Point-N-Click on your Desktop. You will be able to start Point-N-Click by double-clicking on this Shortcut rather than having to go through the “Start | Programs | Point-N-Click | Point-N-Click” route.
デスクトップにPoint-N-Clickのショートカットを配置します。 [スタート | Point-N-Click | Point-N-Click] のルートをクリックするのではなく、このショートカットをダブルクリックすることで、Point-N-Clickを開始できます。
- [Default to Left Click]
If this is checked Point-N-Click will automatically select Left Click after any click is performed instead of having no click selected. If this is unchecked after each click Point-N-Click will become inactive with no click selected. The Cancel button with unselected the Left Click until after another click is selected.
これがチェックされている場合、クリックが選択されていないのではなく、クリックが実行された後、Point-N-Clickは自動的に左クリックを選択します。 クリックするたびにこれがオフになっている場合、クリックなしでPoint-N-Clickが非アクティブになります。 別のクリックが選択されるまで、左クリックの選択を解除した[キャンセル]ボタン。
- [Visible When Active]
When AutoDock and AutoHide are both enabled this setting will control whether the Point-N-Click form will stay visible after an AutoMouse event is selected and before it is completed. When Visible When Active is not enabled Point-N-Click will hide as soon as the pointer moves off of the form. If it is enabled the form will not hide until after the click event is completed.
AutoDockとAutoHideの両方が有効になっている場合、この設定は、AutoMouseイベントが選択された後、完了する前に、Point-N-Clickフォームを表示したままにするかどうかを制御します。 [Visible When Active]が有効になっていない場合、ポインタがフォームから離れるとすぐにPoint-N-Clickが非表示になります。 有効にすると、クリックイベントが完了するまでフォームは非表示になりません。
- [Visual Dwelling Feedback]
When enabled the mouse cursor will change to a target cursor whenever Point-N-Click is dwelling in preparation for doing a mouse click. The cursor will change back as soon as the cursor is moved or the mouse click is generated. Visual feedback will also occur when dwelling over a Remote AutoMouse area. Note: For some programs the cursor will not change this is because some programs such as the Visual Basic Programming Environment maintain a very tight control of the cursor and it is not possible or wise to attempt to override their cursor selection.
有効にすると、マウスクリックを行うための準備でPoint-N-Clickが常駐するたびに、マウスカーソルがターゲットカーソルに変わります。 カーソルが移動するか、マウスクリックが生成されるとすぐに、カーソルが元に戻ります。 リモートAutoMouseエリアに住むときにも視覚的なフィードバックが発生します。 注:一部のプログラムでは、Visual Basicプログラミング環境などの一部のプログラムがカーソルの非常に厳密な制御を維持し、カーソル選択をオーバーライドしようとすることが不可能または賢明ではないため、これはカーソルを変更しません。
- [Audio Dwelling Feedback]
When enabled the mouse cursor will output a steady tone whenever Point-N-Click is dwelling in preparation for doing a mouse click. The tone will stop as soon as the cursor is moved or the mouse click is generated. A repeating tone will always sound when dwelling on a Remote AutoMouse area. This will occur independent of the Audio Dwelling Feedback setting and cannot be turned off.
有効にすると、マウスカーソルは、マウスクリックの準備のためにPoint-N-Clickが滞留しているときは常に安定したトーンを出力します。 カーソルが移動するか、マウスクリックが生成されるとすぐにトーンが停止します。 リモートAutoMouseエリアに住んでいるとき、繰り返し音が常に鳴ります。 これは、音声滞留フィードバック設定とは無関係に発生し、オフにすることはできません。
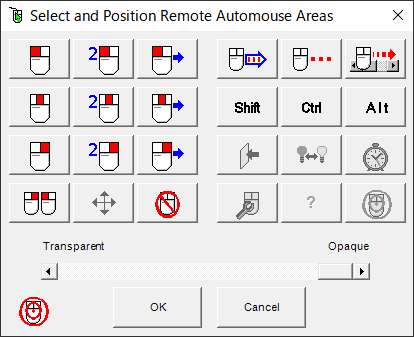
- [Show Remote AutoMouse Areas]
When enabled the Remote AutoMouse areas will display a box indicating the location and type of click for each button that has been activated. This is useful for training purposes. These boxes cannot be seen when in a full screen program. It may take practice to be able to use Remote AutoMouse areas effectively, but once learned they make using full screen programs possible.
有効にすると、リモートAutoMouseエリアには、アクティブ化された各ボタンのクリックの場所とタイプを示すボックスが表示されます。 これは、トレーニングの目的に役立ちます。 これらのボックスは、フルスクリーンプログラムでは表示できません。 リモートAutoMouseエリアを効果的に使用するには練習が必要な場合がありますが、一度学習するとフルスクリーンプログラムの使用が可能になります。
They will even work with many full screen games. When this option is disabled there will be no indicator boxes to show where the Remote AutoMouse areas are located. A repeating tone is always sounded when dwelling over Remote AutoMouse areas. The setting of this option does not affect this audio feedback.
彼らは多くのフルスクリーンゲームでも動作します。 このオプションを無効にすると、リモートAutoMouseエリアの場所を示すインジケーターボックスが表示されなくなります。 リモートAutoMouseエリアに住むと、繰り返し音が常に鳴ります。 このオプションの設定は、この音声フィードバックに影響しません。
- [No Sound When Selecting]
When disabled there is a “thunk” sound when an AutoMouse function is selected. When it is checked the sound does not occur.
無効にすると、AutoMouse機能が選択されたときに「thunk(ボッ)」サウンドが鳴ります。 チェックすると、音は発生しません。
- [No Sound When Clicking]
When disabled there is a “click” sound when an mouse click is performed. When it is checked the sound does not occur.
無効にすると、マウスクリックが実行されたときに「クリック」音がします。 チェックすると、音は発生しません。
- [AutoSelect Delay]
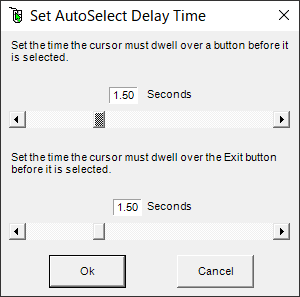
Invoking this option is the way you set the amount of time you need to have your mouse pointer dwell over a button, before it is selected and turns from yellow to red. You will be given control of a slider that allows you to change this delay time from 0.3 to 5.00 seconds, in increments of 0.01 seconds.
このオプションを呼び出すと、ボタンが選択されて黄色から赤色に変わる前に、ボタンの上にマウスポインターを置く必要がある時間を設定できます。 この遅延時間を0.3秒から5.00秒まで、0.01秒単位で変更できるスライダーのコントロールが与えられます。
When you click the Ok button, your mouse will begin using the delay time you selected. If you change your mind and don’t want to set or change the delay time, just click the Cancel button.
[OK]ボタンをクリックすると、選択した遅延時間でマウスが使用を開始します。 気が変わって遅延時間を設定または変更したくない場合は、[キャンセル]ボタンをクリックしてください。
- [AutoMouse Delay]
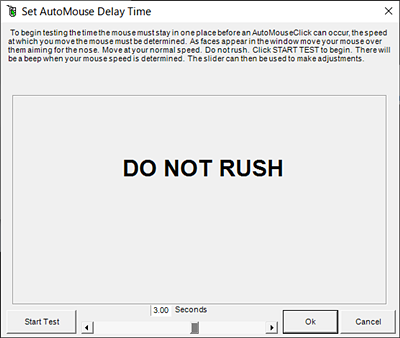
This form allows controlling how long the mouse pointer has to hover over a spot before the selected click event will activate. It estimates this value based on the speed and accuracy the user has moving to targets. It is important to follow the directions and not rush the test. Move at your normal speed.
このフォームを使用すると、選択したクリックイベントがアクティブになる前に、マウスポインターがスポット上をホバーする時間を制御できます。 ユーザーがターゲットに移動する速度と精度に基づいて、この値を推定します。 指示に従うこと、およびテストを急がないことは重要です。 通常の速度で移動します。
At the end of the test the slider bar will be active to allow fine tuning the Auto Mouse Delay time. Manual adjustments of this value should be done with care as improper settings will make the program ineffective. The test can always be re-run to correct errors caused by manual adjustments. It is preferable that the Sensitivity test be run first to make hitting the targets easier.
テストの終了時に、スライダーバーがアクティブになり、自動マウス遅延時間を微調整できます。 不適切な設定はプログラムを無効にするため、この値の手動調整は注意して行う必要があります。 テストはいつでも再実行して、手動調整によって生じたエラーを修正できます。 ターゲットへのヒットを容易にするために、感度テストを最初に実行することをお勧めします。
- [Sensitivity]
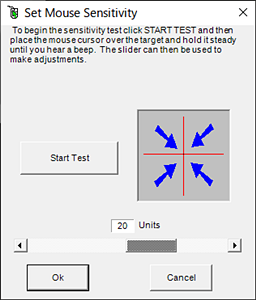
This form allows controlling how sensitive Point-N-Click is to mouse movement. It is used to measure how much ‘jiggle’ the user experiences when trying to hold the mouse in one place. Follow the directions. At the end of the test the slider bar will be active to allow fine tuning the mouse sensitivity to ‘jiggle’.
このフォームでは、マウスの動きに対するPoint-N-Clickの感度を制御できます。 これは、マウスを1か所で保持しようとしたときにユーザーがどの程度「jiggle(揺れる)」するかを測定するために使用されます。 指示に従う。 テストの終了時に、スライダーバーがアクティブになり、マウスの感度を「jiggle(揺れる)」に微調整できます。
Manual adjustments of this value should be done with care as improper settings will make the program ineffective. The test can always be re-run to correct errors caused by manual adjustments. It is preferable to run this test before the AutoMouse Delay test.
不適切な設定はプログラムを無効にするため、この値の手動調整は注意して行う必要があります。 テストはいつでも再実行して、手動調整によって生じたエラーを修正できます。 AutoMouse Delayテストの前にこのテストを実行することをお勧めします。
- [Break Timer Intervals]
This form controls the Break Timer alarm. It can be used to set the length of time in minutes that the timer wants before setting off it’s alarm. The timer can be set between 1 to 180 minutes. It also controls how long the alarm will ring before resetting the Break Timer.
このフォームはBreak Timerアラームを制御します。 アラームをオフにするまでのタイマーの所要時間を分単位で設定するために使用できます。 タイマーは1〜180分の間で設定できます。 また、ブレークタイマーをリセットする前にアラームが鳴る時間も制御します。
The alarm can be set to ring between 0 and 60 minutes. If 0 minutes is selected the alarm will ring continuously until it is manually reset by pressing the alarm button on the Break Timer form. If the timer intervals are changed while the Break Timer is running the amount of time left will automatically be updated based on the new timer values.
アラームは、0〜60分間鳴るように設定できます。 0分を選択すると、Break Timerフォームのアラームボタンを押して手動でリセットするまで、アラームが鳴り続けます。 Break Timerの実行中にタイマー間隔が変更された場合、残りの時間は新しいタイマー値に基づいて自動的に更新されます。
- [Transparency]
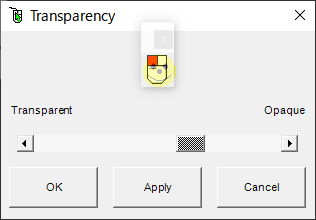
This option is only available on Windows 2000, XP, and later Windows operating system. Normally the Point-N-Click Form is opaque and you cannot see what is hidden behind it. This option lets you make the Point-N-Click form varying degrees of transparent so that you can see what is below it.
このオプションは、Windows 2000、XP、およびそれ以降のWindowsオペレーティングシステムでのみ使用できます。 通常、Point-N-Clickフォームは不透明で、背後に隠れているものを見ることができません。 このオプションを使用すると、Point-N-Clickフォームの透明度を変更できるため、その下にあるものを確認できます。
- [Run at Boot Up]
- [Selections]タブ

- [AutoMouse Functions]
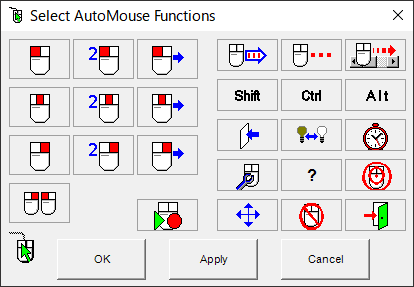
This option displays the form that is used to configure the Point-N-Click form. See Select AutoMouse Functions for details.
このオプションは、Point-N-Clickフォームの設定に使用されるフォームを表示します。 詳細については、AutoMouse関数の選択を参照してください。
- [Remote AutoMouse Areas]
This option displays the form that is used to configure the Remote AutoMouse areas. See Select Remote AutoMouse Functions for details.
このオプションは、リモートAutoMouseエリアの設定に使用されるフォームを表示します。 詳細については、リモートAutoMouse機能の選択を参照してください。
- [Initial AutoMouse Setting]
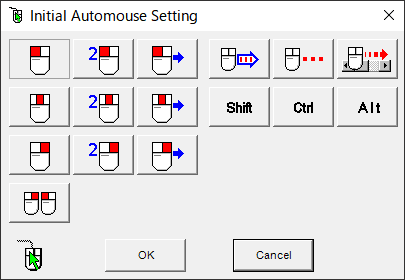
This option allows you to specify any combination of AutoMouse buttons to be selected when Point-N-Click is started.
このオプションを使用すると、Point-N-Clickの開始時に選択されるAutoMouseボタンの任意の組み合わせを指定できます。
- [Exclude Programs]
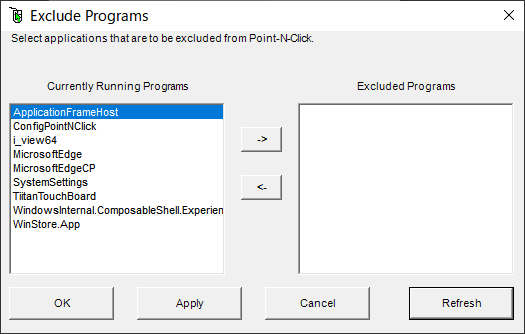
This option displays the form that is used to specify a group of programs that the user does not want Point-N-Click to work with. While one of the selected programs is the foreground program Point-N-Click will not perform any mouse functions.
このオプションは、ユーザーがPoint-N-Clickを使用したくないプログラムのグループを指定するために使用されるフォームを表示します。 選択したプログラムの1つはフォアグラウンドプログラムですが、Point-N-Clickはマウス機能を実行しません。
The Exclude Programs form will show all the currently running programs that are displayed on the taskbar. Highlight the program you wish to add to the exclude list and click the ‘->’ button. To remove a program from the exclude list highlight it in the excluded programs list and click the ‘<-‘ button. The Refresh button will rebuild the list of currently running programs.
[プログラムの除外]フォームには、タスクバーに表示されている現在実行中のすべてのプログラムが表示されます。 除外リストに追加するプログラムを強調表示し、[->]ボタンをクリックします。 除外リストからプログラムを削除するには、除外プログラムリストでプログラムを強調表示して、[<-]ボタンをクリックします。 [更新]ボタンは、現在実行中のプログラムのリストを再構築します。
- [ColorSelection]
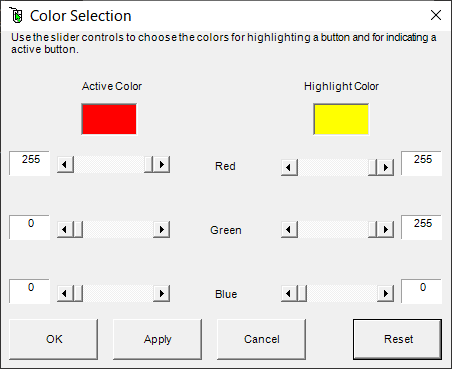
This option displays the form that is used to configure the colors that indicate an AutoMouse button is highlighted (yellow) or active (red). Simply move the sliders until you have found a color you like. The Reset button will restore the default colors.
このオプションは、AutoMouseボタンが強調表示(黄色)またはアクティブ(赤色)されていることを示す色の設定に使用されるフォームを表示します。 好きな色が見つかるまでスライダーを動かしてください。 [リセット]ボタンをクリックすると、デフォルトの色が復元されます。
- [AutoMouse Functions]
- [Macros]タブ

- [Enable Macros]
When enabled the Macro form will appear next to Point-N-Click. This form can be used to record, delete, or playback macros. A macro is a recorded sequence of mouse clicks. Since only the clicks and not the timing or position of the clicks is recorded. The same macro can be used for many tasks. For details see Macros.
有効にすると、Point-N-Clickの横にマクロフォームが表示されます。 このフォームは、マクロの記録、削除、または再生に使用できます。 マクロは、マウスクリックの記録されたシーケンスです。 クリックのみが記録され、クリックのタイミングや位置は記録されないため。 同じマクロを多くのタスクに使用できます。 詳細については、マクロを参照してください。
- [Hide]
When enabled the Macro form will colla
pse to a thin bar or wand at the side of the Point-N-Click form. Moving the mouse pointer over the wand will cause the Macro form to reappear. For details see Macros.
有効にすると、Point-N-Clickフォームの横にあるマクロフォームが細いバーまたは棒に折りたたまれます。 マウスポインターを杖の上に移動すると、マクロフォームが再表示されます。 詳細については、マクロを参照してください。
- [Select Default Macro]
This option allows the user to select a Macro that will begin playback when Point-N-Click is started. For details see Macros.
このオプションにより、ユーザーは、Point-N-Clickの開始時に再生を開始するマクロを選択できます。 詳細については、マクロを参照してください。
- [Enable Macros]
- [Help]タブ
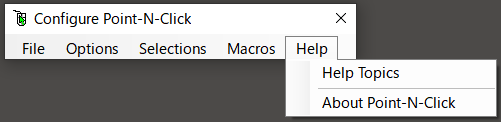
- [Help]
This option displays this file in the Windows Help System.
このオプションは、Windowsヘルプシステムにこのファイルを表示します。
- About Point-N-Click
This option displays the version numbers of the various Point-N-Click programs.
このオプションは、さまざまなPoint-N-Clickプログラムのバージョン番号を表示します。
- [Help]
◆AutoMouse Buttons
- AutoMouse
The AutoMouse buttons are used to select Mouse Click events. Each button produces a specific type of mouse click. To select an event, hold the mouse pointer on a button. It will turn yellow. Hold the pointer over the button until it turns red and you hear a soft “thunk” sound. The button is now selected.
AutoMouseボタンは、マウスクリックイベントを選択するために使用されます。 各ボタンは、特定の種類のマウスクリックを生成します。 イベントを選択するには、マウスポインターをボタンの上に置きます。 黄色に変わります。 ボタンが赤に変わり、柔らかい「thunk(ボッ)」音が聞こえるまで、ボタンの上にポインタを置きます。 これでボタンが選択されました。
The time it takes to select the button is controlled by the AutoSelect Delay setting in Configuration Options . Move your mouse pointer to the location where you want the click to take place and hold the pointer steady. After the number of seconds specified by the AutoMouse Delay setting in Configuration Options the mouse click will be generated and you will hear a soft “click” sound.
ボタンを選択するのにかかる時間は、[設定オプション]の[AutoSelect Delay (自動選択遅延)]設定によって制御されます。 クリックする場所にマウスポインターを移動し、ポインターを固定します。 設定オプションのAutoMouse遅延設定で指定された秒数が経過すると、マウスクリックが生成され、ソフトな「クリック」音が聞こえます。
A selected button turns red and remains red until it is deselected or the mouse click is made. Buttons automatically deselect after a click is made or another button is selected. Normally a move must occur before Point-N-Click will start the AutoMouse Delay timer. If the mouse is not moved no click will occur.
選択されたボタンは赤くなり、選択解除されるかマウスクリックが行われるまで赤のままです。 ボタンをクリックするか、別のボタンを選択すると、ボタンは自動的に選択解除されます。 通常、Point-N-ClickがAutoMouse Delayタイマーを開始する前に移動する必要があります。 マウスを動かさないと、クリックは発生しません。
To be considered a move the pointer must leave the Point-N-Click form. Generally the Point-N-Click form is a safe place to “disarm” a click. But care must be taken not to do a Left Click on either the close box at the right of the title bar or the mouse icon at the left of the title bar. Both these locations will cause Point-N-Click to exit.
移動と見なされるには、ポインターがPoint-N-Clickフォームを離れる必要があります。 通常、Point-N-Clickフォームは、クリックを「解除」する安全な場所です。 ただし、タイトルバーの右側にある閉じるボックスまたはタイトルバーの左側にあるマウスアイコンを左クリックしないように注意する必要があります。 これらの両方の場所により、Point-N-Clickが終了します。
The most commonly used mouse clicks are:
最も一般的に使用されるマウスクリックは次のとおりです。
 Left Click 左クリック
 Right Click 右クリック
 Left Double Click 左ダブルクリック
Less commonly used mouse clicks are the click and drag moves. Because of system constraints click and drag moves will not start or terminate on the Point-N-Click form . This does not affect functionality since click and drags have no meaning to Point-N-Click and the form is moved using the Move button:
あまり使用されないマウスクリックは、クリック&ドラッグの動きです。 システムの制約により、クリック&ドラッグはPoint-N-Clickフォームで開始または終了しません。 クリックとドラッグはPoint-N-Clickには意味がなく、フォームは[移動]ボタンを使用して移動されるため、これは機能に影響しません。
To use the click and drag function, select the appropriate click and drag button. When it is highlighted and selected you will hear a “thunk” sound. Move the mouse to the position where you want to start the click and drag. Hover until you hear a “click” then move the mouse to where you want the click and drag to stop. Hover again until you hear another “click”. All done.
クリック&ドラッグ機能を使用するには、適切なクリック&ドラッグボタンを選択します。 強調表示して選択すると、「thunk(ボッ)」音が聞こえます。 クリック&ドラッグを開始する位置にマウスを移動します。 「クリック」が聞こえるまで保持し、クリックしてドラッグしたい場所にマウスを移動します。 別の「カチッ」という音が聞こえるまでもう一度保持して、 全て終了です。
 Left Click and Drag (左クリック&ドラッグ)
 Right Click and Drag (右クリック&ドラッグ)
To cancel a selected Mouse Click event:
選択したマウスクリックイベントをキャンセルするには:
 Cancel the selected Mouse Click event and unselect all Repeat, Shift, Ctrl, and Alt options.
選択したマウスクリックイベントをキャンセルし、[繰り返し]、[シフト]、[Ctrl]、[Alt]のすべてのオプションを選択解除します。
- Repositioning and Resizing the Window
ウィンドウの位置変更とサイズ変更
You may move Point-N-Click to any position on the screen by following the instructions below: To keep the user from accidentally moving Point-N-Click into an unusable position (buttons off screen) the final position is always checked and adjusted for visibility. Point-N-Click will not adjust it’s position if a “real” mouse click and drag is used to position the form unless Docking is turned on.
次の手順に従って、Point-N-Clickを画面上の任意の位置に移動できます。ユーザーが誤ってPoint-N-Clickを使用できない位置(画面外のボタン)に移動させないように、最終位置は常にチェックおよび調整されます 可視性。 ドッキングがオンになっていない限り、フォームを配置するために「実際の」マウスクリックおよびドラッグが使用される場合、Point-N-Clickはその位置を調整しません。
Version 1.4.55 or later of Click-N-Type will also check for Point-N-Click’s position and refuse to block it. Two buttons that affect positioning, as well, are Docking and Hiding.
Click-N-Typeのバージョン1.4.55以降でも、Point-N-Clickの位置を確認し、ブロックを拒否します。 配置に影響する2つのボタンは、ドッキングと非表示です。
Please note that the size of the Point-N-Click form is not fixed and can be changed within limits either by using the Select AutoMouse Functions options in the Configuration program or by manually clicking and dragging the edges of the form. If the form size is decreased manually it can be only decreased to about half of the original width and height.
Point-N-Clickフォームのサイズは固定されておらず、設定プログラムのSelect AutoMouse Functionsオプションを使用するか、フォームの端をクリックしてドラッグすることで制限内で変更できることに注意してください。 フォームのサイズを手動で縮小する場合、元の幅と高さの約半分までしか縮小できません。
This limit is imposed because the icons on the form will become too small to be recognized if they are made smaller. The form can be increased in size to twice it’s initial size. To resize the form move the cursor to one edge of the form and when the cursor changes to a double arrow left click and drag the form edge to the size desired.
フォーム上のアイコンが小さくなりすぎると認識できなくなるため、この制限が課せられます。 フォームのサイズを初期サイズの2倍に増やすことができます。 フォームのサイズを変更するには、カーソルをフォームの一方の端に移動し、カーソルが二重矢印に変わったら、フォームの端を目的のサイズまでクリックしてドラッグします。
To restore the form to it’s initial size, select the Configuration Program button (wrench icon) then Selections|Select AutoMouse Functions... Clicking the OK button will restore the form size. The Configuration program must be run from the wrench icon and not the Start Menu for this to work.
フォームを元のサイズに戻すには、[設定プログラム]ボタン(レンチアイコン)を選択し、[選択| AutoMouse機能の選択...]をクリックして、フォームサイズを復元します。 これを機能させるには、[スタート]メニューではなく、レンチアイコンから設定プログラムを実行する必要があります。
 Move the mouse pointer so it’s over the Move button.
マウスポインターを移動して、[移動]ボタンの上に移動します。
- Wait for the button to turn red.
ボタンが赤くなるまで待ちます。
- The Mouse pointer will change to the move cursor. Move the pointer to the place on the desktop where you want the top left corner of Point-N-Click to be located.
マウスポインターが移動カーソルに変わります。 Point-N-Clickの左上隅を配置するデスクトップ上の場所にポインターを移動します。
- Hover until Point-N-Click moves to where you want it.
Point-N-Clickが目的の場所に移動するまで保持します。
The Move button can also be used to temporarily reposition the Remote AutoMouse Areas.
[移動]ボタンを使用して、リモートAutoMouseエリアを一時的に再配置することもできます。
◆Advanced Clicking
- Shift, Ctrl, and Alt Options
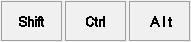 When one or more of these buttons are depressed shift control and / or alt clicks will be generated. This is the same as holding down the Shift, Ctrl or Alt key when doing a physical mouse click.
これらのボタンの1つ以上が押されると、シフトコントロールおよび/またはAltクリックが生成されます。 これは、物理的なマウスクリックを行うときにShift、Ctrl、またはAltキーを押した場合と同じです。
- Repeat With Movement Required
 When this is enabled the selected mouse click will be repeated. Each repeat will be triggered by the movement of the mouse pointer. This is useful but not required for navigating menus. The first click brings down the menu.
これを有効にすると、選択したマウスクリックが繰り返されます。 各繰り返しは、マウスポインターの動きによってトリガーされます。 これは便利ですが、メニューのナビゲートには必要ありません。 最初のクリックでメニューが表示されます。
Until you move the mouse no further clicks are generated. When you decide which menu item you want move to it and a click will be generated. This option, Repeat With No Movement Required and Fast Repeat With No Movement Required are mutually exclusive.
マウスを動かすまで、それ以上のクリックは生成されません。 どのメニュー項目に移動するかを決定すると、クリックが生成されます。 このオプション、「移動不要の繰り返し」と「移動不要の高速繰り返し」は相互に排他的です。
- Repeat With No Movement Required
 When this is enabled the selected mouse click will be repeated. Each repeat will be triggered by the AutoMouse Delay not by a movement of the mouse pointer. This is useful for dealing with scroll bars and slider bars.
これを有効にすると、選択したマウスクリックが繰り返されます。 各繰り返しは、マウスポインターの動きではなく、AutoMouse Delayによってトリガーされます。 これは、スクロールバーとスライダーバーを扱うのに便利です。
The first movement and hover initiates a mouse click and further mouse clicks are generated based on the AutoMouse Delay. Clicks will continue to be generated unless the pointer moves. This option, Repeat With Movement Required and Fast Repeat With No Movement Required are mutually exclusive.
最初の動きと保持によりマウスクリックが開始され、AutoMouse Delayに基づいてさらにマウスクリックが生成されます。 ポインターが移動しない限り、クリックは引き続き生成されます。 このオプション、「移動を必要とする繰り返し」と「移動を必要としない高速繰り返し」は相互に排他的です。
- Fast Repeat With No Movement Required
 When this is enabled the selected mouse click will be repeated at the fastest speed allowed. Each repeat will be triggered by the system setting for double click speed, not by a movement of the mouse pointer. This is useful for dealing with scroll bars and slider bars.
これを有効にすると、選択したマウスクリックが許可されている最速で繰り返されます。 各繰り返しは、マウスポインターの動きではなく、ダブルクリック速度のシステム設定によってトリガーされます。 これは、スクロールバーとスライダーバーを扱うのに便利です。
The first movement and hover initiates a mouse click and further mouse clicks are generated based on the AutoMouse Delay. Clicks will continue to be generated unless the pointer moves. This repeat function only works with Left, Middle and Right clicks. It will not work with multiple click, double click or click and drag functions. This option, Repeat With Movement Required and Repeat With No Movement are mutually exclusive.
最初の動きとホバーによりマウスクリックが開始され、AutoMouse Delayに基づいてさらにマウスクリックが生成されます。 ポインターが移動しない限り、クリックは引き続き生成されます。 この繰り返し機能は、左クリック、中クリック、右クリックでのみ機能します。 複数クリック、ダブルクリック、またはクリックアンドドラッグ機能では機能しません。 このオプション、「必要な動きを繰り返す」と「動きのない繰り返し」は相互に排他的です。
- Right Click Then Left Click
 If this click event is selected a right click and then a left click will be generated. If a repeat option is selected the left click will be repeated. This click event is useful but not required for navigating right click context menus. The right click will bring up the context menu and the left click can be used to select the menu item.
このクリックイベントが選択されている場合、右クリックしてから左クリックが生成されます。 繰り返しオプションが選択されている場合、左クリックが繰り返されます。 このクリックイベントは便利ですが、右クリックのコンテキストメニューをナビゲートするのに必須ではありません。 右クリックするとコンテキストメニューが表示され、左クリックを使用してメニュー項目を選択できます。
- Middle Click
 If this click event is selected a middle click will be generated. This click event is the same as clicking a middle button on a mouse or clicking the wheel on a wheeled mouse..
このクリックイベントが選択されている場合、中間クリックが生成されます。 このクリックイベントは、マウスの中央ボタンをクリックするか、ホイール付きマウスのホイールをクリックするのと同じです。
- Middle Double Click
 If this click event is selected a double middle click will be generated. This click event is the same as double clicking a middle button on a mouse or double clicking the wheel on a wheeled mouse.
このクリックイベントが選択された場合、ダブルミドルクリックが生成されます。 このクリックイベントは、マウスの中央ボタンをダブルクリックするか、ホイール付きマウスのホイールをダブルクリックするのと同じで
- Right Double Click
 If this click event is selected a double right click will be generated. This click event is the same as double clicking a right button on a mouse.
このクリックイベントが選択されると、ダブル右クリックが生成されます。 このクリックイベントは、マウスの右ボタンをダブルクリックするのと同じです。
- Middle Click And Drag
 If this click event is selected a middle click and drag will be generated. This click event is the same as clicking and dragging middle button on a mouse.
このクリックイベントが選択されると、中クリックとドラッグが生成されます。 このクリックイベントは、マウスの中央ボタンをクリックしてドラッグするのと同じです。
- Configuration Program
 Selecting this button will disable AutoHide and Remote AutoMouse and start the Configuration Program. The program will locate itself next to the Point-N-Click form.
このボタンを選択すると、AutoHideとRemote AutoMouseが無効になり、設定プログラムが起動します。 プログラムは、Point-N-Clickフォームの隣に配置されます。
While the program is running repeated selecting of the Configuration button or Remote AutoMouse button will produce a ding. Check your task bar. The program may have lost focus and is hidden by another program. You must click on Configure Point-N-Click on the task bar to regain the focus.
プログラムの実行中に、設定ボタンまたはリモートAutoMouseボタンを繰り返し選択すると、音が鳴ります。 タスクバーを確認してください。プログラムがフォーカスを失い、別のプログラムによって隠されている可能性があります。 フォーカスを取り戻すには、タスクバーの[Point-N-Clickの設定]をクリックする必要があります。
- Help
 Selecting this button will bring up this file in the Windows Help System.
◆Docking & Hiding
- Docking
 When Docking is selected the form is moved either left or right to the nearest side of the monitor. The form will return to a docked position if it is moved. When Docking is disabled Hiding is automatically disabled as well.
ドッキングを選択すると、フォームはモニターの最も近い側に左または右に移動します。 フォームを移動すると、フォームはドッキングされた位置に戻ります。 ドッキングを無効にすると、非表示も自動的に無効になります。
- Hiding
 When Hiding is selected the form will move off the desktop when the mouse pointer leaves it. Only a small sliver of the form will remain. The form will redisplay when the pointer touches the exposed portion of the form.
[非表示]を選択すると、マウスポインターが離れると、フォームがデスクトップから移動します。 フォームの小さなスライバーのみが残ります。 ポインターがフォームの露出部分に触れると、フォームが再表示されます。
This takes the form out of the way when it is not needed, but returns it when needed. Hiding requires that Docking be selected as well. When Hiding is enabled Docking is automatically enabled as well. For extended desktops Hiding will only occur at the left and right edges of the extended desktop and not at the boundaries between monitors.
これは、不要な場合は邪魔にならないようにフォームを取得しますが、必要な場合はフォームを返します。 非表示にするには、ドッキングも選択する必要があります。 非表示を有効にすると、ドッキングも自動的に有効になります。 拡張デスクトップの場合、非表示は拡張デスクトップの左端と右端でのみ発生し、モニター間の境界では発生しません。
- Visible When Active
This option is set in the Configuration program. When it is enabled and Hiding is selected the Point-N-Click form will not hide when the mouse pointer is moved off the form to perform a click.
このオプションは、設定プログラムで設定されます。 有効で非表示が選択されている場合、クリックを実行するためにマウスポインターがフォームから移動しても、Point-N-Clickフォームは非表示になりません。
When Visible When Active is disabled and Hiding is selected the Point-N-Click form will hide when the mouse pointer is moved off the form to perform a click.
[表示時] [アクティブ時]が無効で、非表示が選択されている場合、クリックを実行するためにマウスポインターをフォームから移動すると、Point-N-Clickフォームが非表示になります。
◆Select AutoMouse Functions
- Configuring the Form
Point-N-Click has more features than the average user may need or want. The Configuration Program menu item Select Functions allows the user to display only the options they use on the form.
Point-N-Clickには、平均的なユーザーが必要または必要とするよりも多くの機能があります。 [設定プログラム]メニュー項目の[機能の選択]を使用すると、ユーザーはフォームで使用するオプションのみを表示できます。
Simply depress the buttons for the functions to be included on the form and unselect the buttons for the functions that are not needed. Clicking the Apply or OK buttons will change the form. Cancel will ignore the changes.
フォームに含める機能のボタンを押すだけで、不要な機能のボタンを選択解除します。 [適用]または[OK]ボタンをクリックすると、フォームが変更されます。 キャンセルは変更を無視します。
The Left Click, Left Double Click, Move and Cancel buttons are required to be on the form and cannot be unselected.
左クリック、左ダブルクリック、移動、キャンセルの各ボタンはフォーム上にある必要があり、選択を解除することはできません。
◆Select Remote AutoMouse Functions
- To allow a user to click when running a full screen application, where the Point-N-Click form cannot be accessed, areas of the desktop can be defined as Remote AutoMouse areas. These areas are targets or ‘hot spots’ that can be activated by dwelling over them without accessing the Point-N-Click form.
Point-N-Clickフォームにアクセスできないフルスクリーンアプリケーションの実行時にユーザーがクリックできるようにするには、デスクトップの領域をリモートAutoMouse領域として定義できます。 これらのエリアはターゲットまたは「ホットスポット」であり、Point-N-Clickフォームにアクセスせずにエリアに住むことでアクティブにできます。
◆連載
- 【まほろば】Windowsのマウス操作向け設定 (Windows設定)
- 【まほろば】Windowsのマウス操作向け設定 (Edge)
- 【まほろば】Windowsのマウス操作向け設定 (ショートカット)
- 【まほろば】Windowsのマウス操作向け設定 (アクセシビリティ機能)
- 【まほろば】Windowsのマウス操作向け設定 (マウスジェスチャ)
- 【まほろば】Windowsのマウス操作向け設定 (Point-N-Click)
◆関連記事
◆関連サイト
- 【テクノツール】アシストクリック 5,000円
- Click Assist 無料
- Emulate Mouse clicks by hovering using Clickless Mouse in Windows 10 無料
- SmartClick $9.95
- Dwell Clicker 2 $30
- Dragger Mouse Button Utility for Windows $105
- Dragger -- Mouse Button Utility for Windows $140
- 【窓の杜】視線追跡デバイスのサポートを拡充した「Windows 10 20H1」Build 18932がプレビュー公開